

Getting a clean, aligned screen protector comes down to three things: a spotless screen, a steady lowering technique, and patience. Clean thoroughly with an alcohol wipe and microfibre cloth, remove any remaining dust with a sticker or tape loop, align using a hinge or applicator frame, then lower the protector slowly and squeegee from the centre outward. Small air gaps normally self-level within 24 hours. Persistent bubbles are almost always dust-related and fixable without replacing the protector.
Two primary methods at a glance:
- Hinge/dry method: tape one edge as a hinge, peel the liner partway, lower and smooth downward. Best for tempered glass.
- Applicator/framed method: slot the device into the frame, remove the liner via pull-tab, lower as guided. Nearly foolproof for first-timers.
Key takeaways
A clean screen, a steady lowering technique, and 24 hours of patience are all you need for a bubble-free screen protector install.
| Point | Details |
|---|---|
| Clean before everything | Use an alcohol wipe in single-direction strokes, dry with microfibre, then lift remaining dust with a sticker. |
| Choose the right method | Tempered glass needs a dry hinge or frame install; hydrogel and TPU film can use a wet method. |
| Squeegee centre to edge | Work bubbles outward from the middle; most small air pockets self-level within 24 hours. |
| Wait before fitting the case | Allow 30–60 minutes for tempered glass before fitting a tight case to avoid edge lifting. |
| SmartProtectors kits | Model-matched protectors with alignment frames and dust-removal tools reduce first-try failure. |
Table of Contents
- What do you need before you start?
- How to install a screen protector step by step
- Which protector type needs which installation method?
- How do you fix bubbles, dust, and other common problems?
- When should you put the case on after installing?
- What does a screen protector actually protect against?
- Expert tricks that most guides skip
- Why DIY installation is almost always the right call
- SmartProtectors kits make the first try the only try
- Sources
What do you need before you start?
The right kit makes the difference between a first-try success and a frustrating redo. Most installation kits include an alcohol wipe, a microfibre cloth, and a dust-removal sticker — use them in that exact order. If your kit is missing any of these, pick up replacements before you begin.
Essential items:
- Screen protector matched to your exact device model
- Alcohol wipe (isopropyl, pre-moistened)
- Microfibre cloth
- Dust-removal sticker or a loop of tape (sticky side out)
- Squeegee or a credit card wrapped in a soft cloth
- Alignment stickers or hinge tape (if supplied)
- Applicator frame (if supplied with the kit)
Environment matters more than most people realise. Work near a window or under a bright lamp so you can see micro-dust before the protector bonds. Low-humidity rooms in winter are the worst offenders for airborne particles. A quick trick: run a hot shower for a couple of minutes, then install in the steamy bathroom — the humidity briefly settles dust in the air, giving you a cleaner window to work in.
Pro Tip: Hold the protector by its edges only. Fingerprints on the adhesive side are nearly impossible to remove cleanly and will cause permanent cloudy patches.
How to install a screen protector step by step
Before anything else: turn the device off, remove the case, and place it face-up on a flat, soft surface (a folded towel works well). Inspect the screen under a side light — tilt the device so the light rakes across the surface and reveals any dust or smears you would otherwise miss.
Cleaning the screen
- Wipe the screen with the alcohol wipe using single-direction strokes, not circular motions. Circular rubbing redistributes residue rather than lifting it.
- Dry immediately with the microfibre cloth, again in single-direction strokes.
- Use the dust-removal sticker (or a tape loop) to lift any remaining specks. Press lightly and peel — do not rub.
- Do a final side-light check. The screen should look completely clear.
Hinge/dry method (tempered glass and most PET film)
This is the standard approach for tempered glass protectors, which require a dry install.
- Dry-fit the protector (liner still on) over the screen. Check that the camera cutout, earpiece, and speaker holes line up correctly.
- Tape one short edge (usually the top) to the device with a strip of tape to create a hinge. The protector should flip up and down cleanly.
- Flip the protector up, peel the liner back about halfway, then fold the liner under itself so it stays out of the way.
- Lower the top edge down to meet the hinge point. Hold it there.
- Slowly lower the rest of the protector while pulling the liner out from underneath with your other hand. Let gravity do most of the work.
- Once fully down, squeegee from the centre outward toward each edge using firm, overlapping strokes.
- Remove the hinge tape and the top protective film (if present).
The most common mistake is rushing the liner removal. Lower the protector a centimetre at a time. If you see a bubble forming, pause, lift that section slightly, and re-lower before continuing.
Applicator/framed method
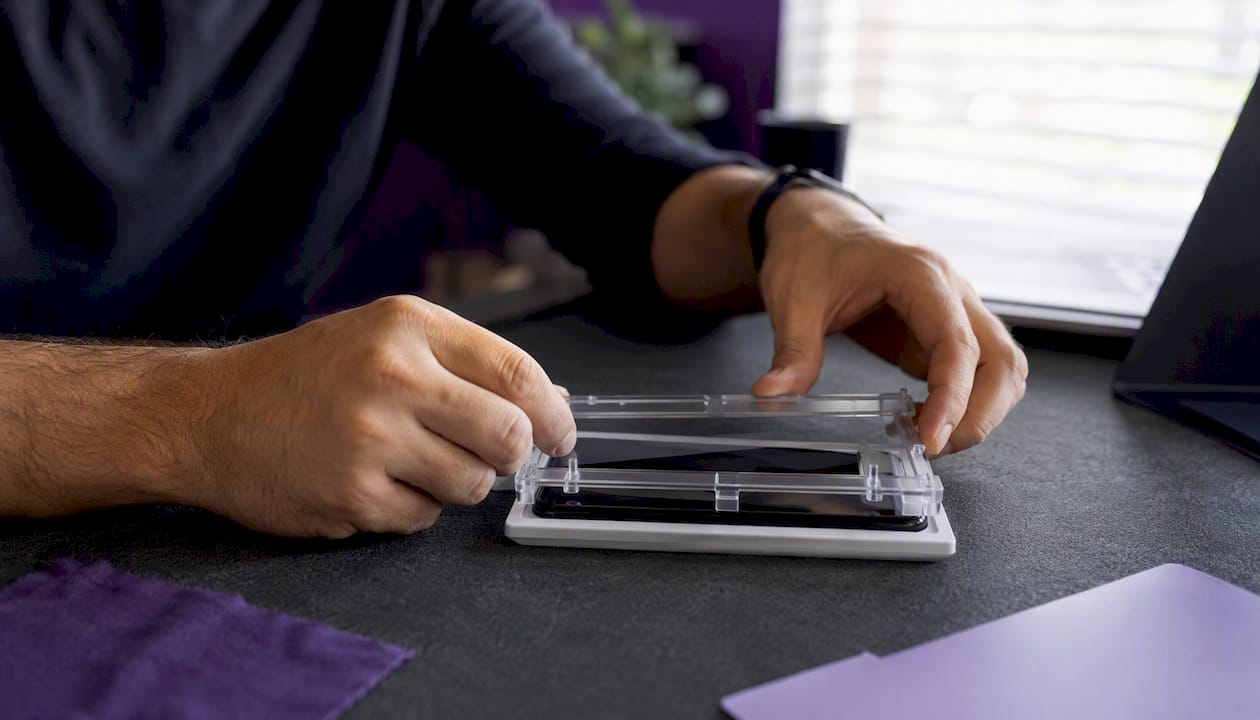
An alignment frame holds the protector centred while you remove the liner, eliminating the two most common failure modes: crooked placement and initial air-trapping. If your kit includes one, use it.
- Slot the device into the frame so it sits flush and level.
- Place the protector into the frame above the device. It should click or rest into position automatically.
- Remove the backing liner using the pull-tab. Do not touch the adhesive side.
- Lower the protector onto the screen as directed by the frame — usually a single smooth press.
- Remove the frame, then peel the top protective film.
- Squeegee from the centre outward.
Wet-film note (hydrogel and TPU)
Wet-install methods apply to flexible hydrogel and TPU films, not tempered glass. Apply the solution provided to both the screen and the adhesive side of the film, align, then slide the film gently to release trapped liquid before squeegeeing. The solution gives you a short repositioning window. Pat the edges dry with the microfibre cloth when done.
Which protector type needs which installation method?
Tempered glass uses a dry install; flexible films and hydrogel may use a wet method and allow more repositioning. Choosing the wrong method for your material is the single fastest route to a ruined install.
For a deeper look at the trade-offs between materials, the tempered glass vs hydrogel comparison covers adhesion, flexibility, and touch sensitivity in detail.
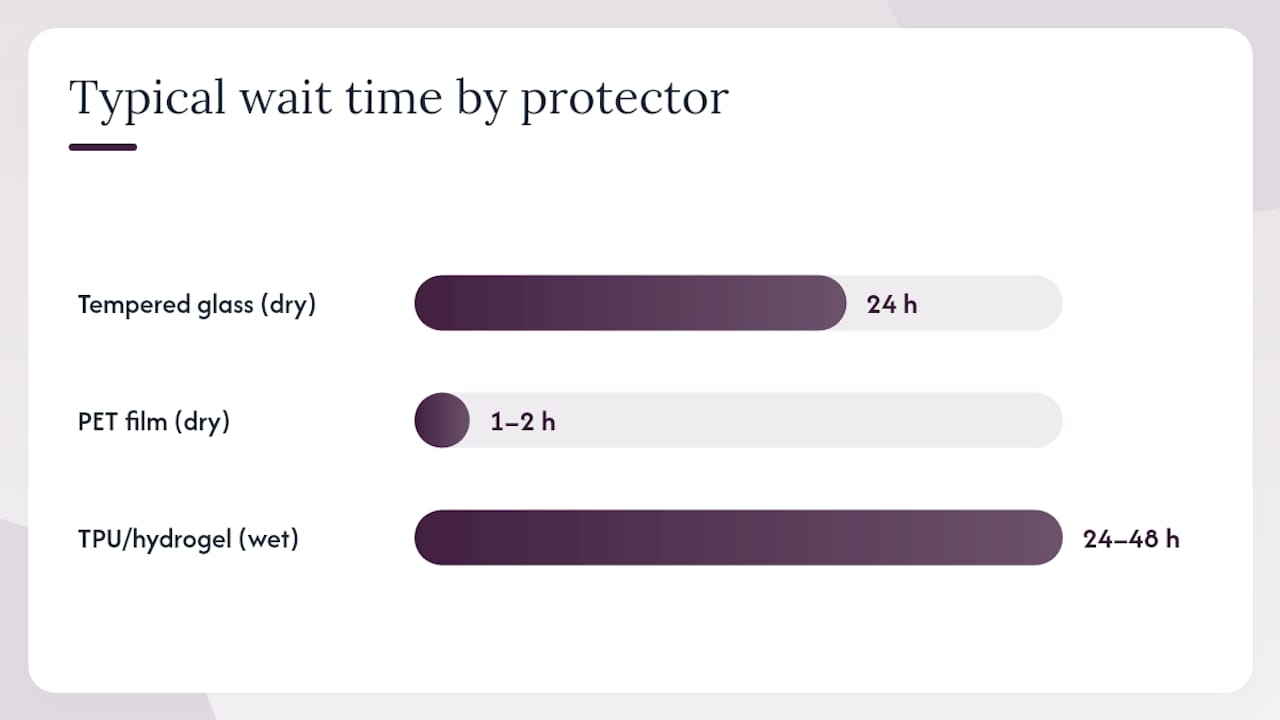
| Protector type | Install method | Repositioning window | Typical wait time | Best environment |
|---|---|---|---|---|
| Tempered glass | Dry only | None once placed | 24 hours full cure | Low dust, good light |
| PET film | Dry (most) | Very brief | 1–2 hours | Low dust |
| TPU/hydrogel | Wet or dry | Short (wet method) | 24–48 hours | Low dust, moderate humidity |
A note on curved-edge protectors. These require a protector cut specifically for your model. A generic curved protector on the wrong device will lift at the edges within days, regardless of how carefully you applied it. Check the model fit before buying, not after.
How do you fix bubbles, dust, and other common problems?
Most post-install issues are fixable. The key is acting calmly and methodically rather than peeling the whole thing off immediately.
Small bubbles (under 1 mm)
- Press firmly from the centre of the bubble outward with a squeegee or cloth-wrapped card.
- If the bubble persists, leave it. Many small air pockets self-level as the adhesive cures over the next 24 hours.
- Check again after 24 hours before doing anything else.
Dust specks under the protector
- Identify the nearest edge to the speck.
- Gently lift that edge using a fingernail or a soft plastic card. Never use anything sharp.
- Use a dust-removal sticker or a tape loop to lift the particle from the screen. Do not press the sticker onto the adhesive side of the protector.
- Re-seat the protector slowly from that edge, squeegeeing as you go.
Large bubbles or streaks that won’t clear
If a large bubble remains after 24 hours, or if you see a streak or cloudy patch that does not respond to squeegeeing, the adhesive is likely contaminated. At that point, replacement is the right call. Repeated lifting and re-seating weakens the adhesive further and invites more dust.
Pro Tip: Never use a sharp implement near the screen or protector. A fingernail or a soft plastic card is the limit. One slip with a knife or key can scratch the display itself.
When should you put the case on after installing?
Fitting a tight case too soon is one of the more overlooked causes of edge lifting. Most installers advise waiting a moderate period for tempered glass before fitting a standard case, and longer for full-coverage edge adhesives where the protector wraps around the curve.
Quick alignment checks before the case goes on:
- Look along the top edge: the earpiece gap should be clear and centred.
- Check the camera cutout under a light. Any overlap will cause lens flare or focus issues.
- Run a fingertip along each side edge. The protector should sit flush with no raised corners.
- If you use a full-coverage protector, confirm it does not extend so far that a slim case pinches the edge and causes lifting.
For tablet installs, the same logic applies — wait at least an hour before fitting a folio case, since the hinge pressure on a large protector can displace the adhesive before it has set.
What does a screen protector actually protect against?
A screen protector is not armour. Understanding what it does and does not do helps you set the right expectations and know when to replace it.
What it protects well:
- Keys, coins, and everyday abrasion that would scratch the display glass
- Minor impacts that a tempered glass protector can absorb by shattering itself rather than the screen
- Preserving the screen’s original condition, which matters for resale value
What it does not guarantee:
- Protection from a hard drop onto a corner or edge — the physics of that kind of impact often exceed what a protector can absorb
- Full edge protection on curved screens, where the protector typically does not wrap all the way around
- Indefinite lifespan — surface scuffs, lifting edges, and touch-sensitivity issues all signal it is time for a replacement
Replace the protector when you notice visible lifting at the corners, a persistent bubble that does not clear, cracks across the surface, or any degradation in touch response. A cracked protector has already done its job; leaving it on longer does not add protection and can scratch the screen as the shards shift.
Expert tricks that most guides skip
The steps above will get you a clean install. These tips push the success rate higher.
Side lighting is your best diagnostic tool. Before you lower the protector, tilt the device so a lamp or window rakes across the screen at a low angle. Dust specks you would never see head-on become obvious. Do the same check after the install to spot edge misalignment before the adhesive sets fully.
Patience is the primary requirement. Experienced installers report far more success by slowing each step and trusting that small bubbles will self-level, rather than forcing repeated re-lifts that invite dust and weaken the adhesive bond.
The steamy-bathroom trick is not folklore. Higher humidity briefly reduces airborne particulates, giving you a materially cleaner install window for the minute or two you need. Run the shower, wait for the steam to build, then work quickly.
Pro Tip: If your kit includes an alignment frame, use it even if you feel confident. Alignment frames eliminate the two typical failure modes — crooked placement and initial air-trapping — and are worth the modest extra cost on a high-end device.
Finally, resist the urge to intervene with small bubbles immediately. Give the adhesive 24–48 hours. Most of what looks alarming after a fresh install is simply air that has not yet had time to migrate out.
Why DIY installation is almost always the right call
For the vast majority of phone and tablet owners, DIY installation is perfectly achievable and the better-value option. The technique is not difficult once you understand the sequence, and a model-specific protector with a decent kit removes most of the variables that cause problems.
That said, there are situations where professional fitting or a premium kit is worth considering. Very curved screens — particularly on flagship phones with aggressive edge curves — leave almost no margin for misalignment, and a mistake there means wasting a protector that costs as much as a budget phone case. Large-format tablets are similar: the surface area is unforgiving, and a single dust speck mid-panel is hard to fix without lifting the whole thing. If your hands are not steady or you are working in an environment you cannot control (a dusty workshop, for example), a professional fitting service or a kit with a full applicator frame is money well spent.
The SmartProtectors view is straightforward: buy the right protector for your exact model, use the tools included in the kit, and follow the sequence above. For most people, that is all it takes.
SmartProtectors kits make the first try the only try
The biggest reason DIY installs go wrong is a mismatch between the protector and the device, or a kit that skips the tools that matter. SmartProtectors stocks model-matched screen protectors for phones, tablets, smartwatches, laptops, and earbuds, with options that include alignment frames, dust-removal stickers, and applicator tabs built into the packaging.
Every protector in the catalogue is selected for fit accuracy. If your device model is not listed, submit a sourcing request and the team will add it. Shipping is straightforward, and the product range covers everything from everyday PET film to full-coverage tempered glass with installation tools for popular models.
For readers who want a retail kit to complement their order, Metro Lock & Key’s HD glass protector range is a useful reference for DIY installation accessories.
Find your device and the right protector at SmartProtectors — and get it right first time.
Sources
The following guides informed the techniques and troubleshooting advice in this article:
- How to Apply a Screen Protector
- How to install a screen protector — bubble-free, dust-free, first try.
- How To Properly Align A Screen Protector For Your Phone
- I found the perfect stress-free way to put a screen protector on my phone — here’s how