

A single lifted corner is usually fixable in under five minutes. Multiple edges peeling, visible cracks, or adhesive that looks cloudy or contaminated? That protector needs replacing, not rescuing.
Three things to do right now:
- Remove your case, because case lip pressure is one of the most common triggers.
- Press firmly from the centre of the protector outward toward the lifted edge, using a clean fingertip or a soft plastic card.
- Tilt the phone under a light and check for trapped dust, cracks, or a milky adhesive layer.
Rule of thumb: if one edge lifts cleanly and the glass is intact, try the rescue steps below. If two or more edges are lifting, or the adhesive looks grey or bubbly across a wide area, replace it.
Pro Tip: Press the lifted edge for 30 seconds with steady, even pressure before doing anything else. Heat from your fingertip softens the adhesive slightly and often re-seats a minor lift without any tools at all.
Key takeaways
Most edge lifting is preventable with the right protector type, a clean installation, and a case that does not press on the protector’s edge.
| Point | Details |
|---|---|
| Single edge lift | Usually rescueable by pressing firmly from centre outward if glass and adhesive are intact. |
| Multiple edges or cracked glass | Replace the protector; rescue attempts will not restore adequate protection. |
| Curved screens need full-glue | A flat protector on a curved display will always show edge halo; choose full-glue curved glass or flexible film. |
| Case compatibility matters | Remove the case for 24 hours to confirm whether it is causing the lift before buying a replacement. |
| SmartProtectors | Stocks curved-edge and full-coverage protectors with installation tools for a wide range of devices, including hard-to-find models. |
Table of Contents
- Why does your screen protector keep lifting at the edges?
- Why curved screens make edge adhesion harder
- How your phone case can cause edge peeling
- How to fix a lifting screen protector safely
- How to install a screen protector so it does not lift
- Which protector types resist edge lifting best?
- The right protector is already at SmartProtectors
- Sources
Why does your screen protector keep lifting at the edges?
Most edge lifting comes down to a handful of causes, and identifying yours determines whether a quick press fixes it or whether you need a new protector entirely.
- Trapped dust or lint. Even a single particle under the adhesive creates a raised point that gradually peels outward. Pocket fluff is the usual culprit.
- Oily or damp skin residue. Finger oils left on the screen before installation break down adhesive contact over days.
- Misalignment during fitting. A protector placed even slightly off-centre puts uneven tension on one edge, which lifts first under normal use.
- Case lip pressure. Tight cases whose lips overlap the protector edge push against it every time you handle the phone. This is especially common with slim, rigid cases.
- Curved or bevelled screen mismatch. Flat tempered glass simply cannot conform to a curved display. The edges sit proud of the screen surface and peel from day one.
- Adhesive degradation. Heat, humidity, and age all weaken silicone adhesive. Temperature swings and humidity are particularly damaging during the first 24 hours after installation, before the adhesive has fully cured.
- Impact damage. A drop can shear the adhesive bond at one corner without visibly cracking the glass, leaving a corner that lifts progressively.
Some causes stack. A curved screen combined with a tight case is one of the fastest routes to persistent lifting, because the case pushes on edges that were never fully adhered to begin with.
Pro Tip: To tell dust from adhesive failure: look at the lifted area at an angle in bright light. A small, defined bubble with a dark speck inside is dust. A large, milky or hazy patch with no clear centre point is adhesive breakdown. Dust is rescueable; adhesive breakdown usually is not.
Recognising the lifting pattern
Different lifting shapes point to different causes, and each has a different repair path.
Corner lift appears as a small triangular peel at one corner, often after a drop or from repeated case removal. Press it back and monitor. If it re-lifts within a day, the adhesive at that corner is gone.
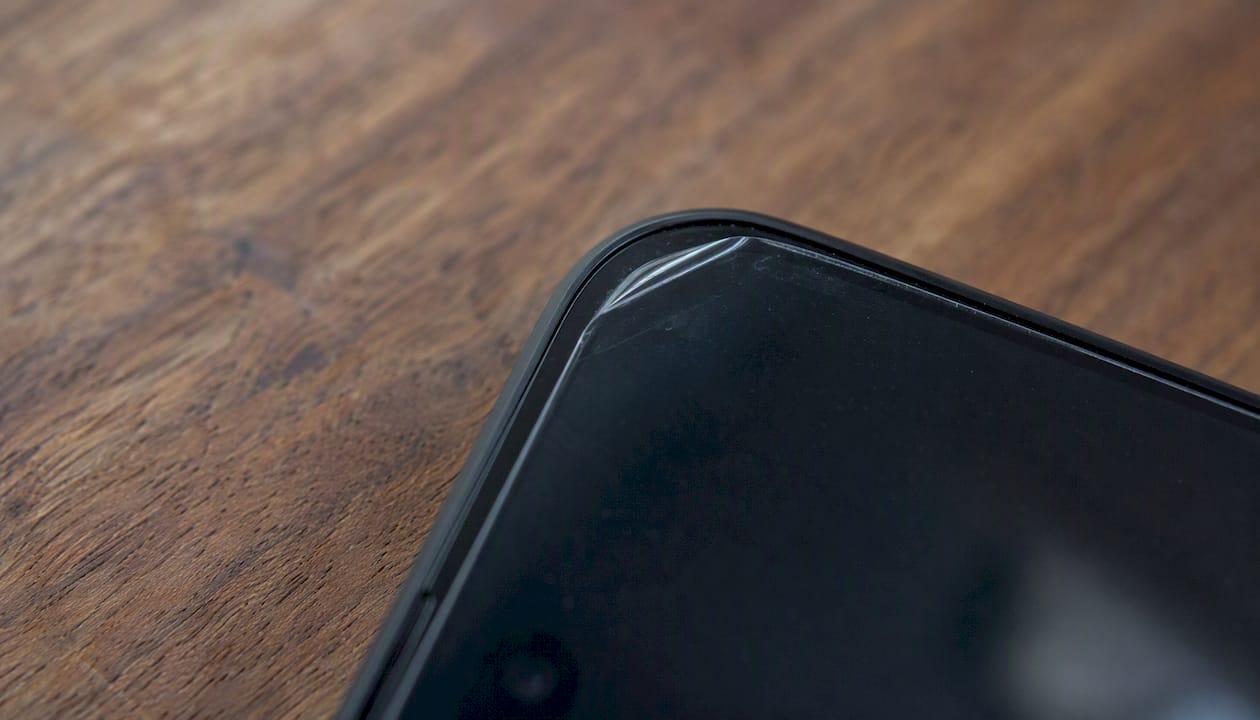
Edge halo is a faint white or silver line running along one full edge, most visible when the screen is off. On curved phones, this is almost always a curvature mismatch rather than a fault. Pressing will not fix it permanently.
Bubble-related lift starts as a bubble that grows over days until the surrounding adhesive releases. Usually caused by dust or an oily surface at installation. Dust removal may rescue it if caught early.
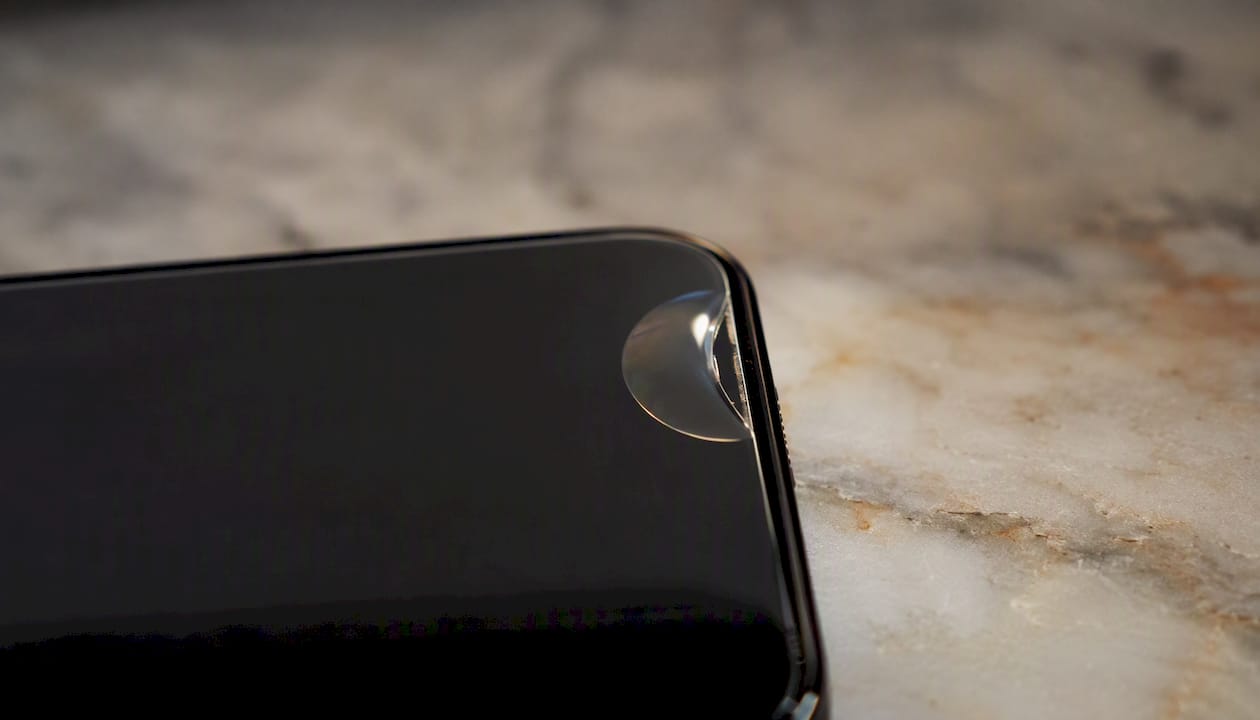
Spot lift is a small raised patch in the middle of the screen, not at an edge. Typically a dust particle or a surface imperfection. Harder to fix without fully removing the protector.
Quick visual check: remove the case, tilt the phone at 45 degrees under a lamp, and press each edge gently. Any edge that springs back immediately has lost adhesion.
Why curved screens make edge adhesion harder
Flat tempered glass is rigid. A curved display is not flat. The physics are straightforward: press a flat sheet against a curved surface and the edges lift. This is why a standard flat protector on a Samsung Galaxy S-series or a Motorola Edge device will almost always show an edge halo within days.
- Flat glass protectors use border-only adhesive. On a flat screen they work well. On any curve, the unadhered centre of each edge bows away from the glass.
- Full-glue curved tempered glass applies adhesive across the entire back surface. It conforms better to gentle curves and dramatically reduces edge halo, though it requires model-specific sizing.
- Flexible film and hybrid (TPU) protectors bend with the screen and offer the best edge contact on pronounced curves. The trade-off is a softer feel and slightly less scratch resistance than glass.
Edge-to-edge tempered glass protectors are engineered with bevelled edges for a cleaner look, but whether they use border-only or full-glue adhesive varies by model. Always check the product description before buying.
Pro Tip: Look for the phrases “full glue”, “curved edge”, or “case friendly” on the product page. “Case friendly” usually means the protector stops short of the very edge, leaving a small gap that prevents case lip pressure. “Full glue” means adhesive covers the whole back surface, not just the border.
How your phone case can cause edge peeling
A case that fits too tightly is one of the most overlooked causes of screen protector lifting at edges. The lip of a rigid case sits directly on top of the protector’s edge. Every time you pick up the phone or flex the case slightly, that lip levers the protector upward.
To test whether your case is the problem:
- Remove the case completely.
- Press all edges of the protector flat and leave the phone bare for 24 hours.
- Check whether the lifted edges have stayed down.
- Reinstall the case and check again after another 24 hours.
If the edges stay flat without the case but lift again once it is back on, the case is the culprit.
When choosing a case compatible screen protector pairing, look for:
- A soft TPU lip rather than a hard polycarbonate edge, which distributes pressure more gently.
- A case lip that sits flush with or slightly below the screen surface, not above it.
- A small visible gap between the case edge and the protector’s edge when the case is fitted.
A phone case with a flexible, low-profile lip is far less likely to cause repeat lifting than a slim rigid case with a raised bezel.
How to fix a lifting screen protector safely
Gather your tools first: a microfibre cloth, dust-removal stickers, a soft plastic card (a loyalty card works), an isopropyl alcohol wipe if you plan to reapply, and clean hands or lint-free gloves.
- Press and hold. Start here. Press the lifted edge firmly from the centre outward for 30 seconds. If it holds, you may be done.
- Remove the case. If the edge lifts again within minutes of pressing, take the case off before going further.
- Use a dust-removal sticker. If you can see a dust particle under the edge, gently lift the protector just enough to slide a dust sticker under it. Do not lift more than a few millimetres. Press the edge back down immediately.
- Partial lift and clean. If the dust is spread along the edge, lift the protector carefully from the corner using a soft card, not a fingernail or metal tool. Wipe the exposed screen area with a microfibre cloth, then press the protector back down from the centre outward.
- Re-seat with gentle heat. Warming the lifted edge for a few seconds with a hairdryer on its lowest setting can soften the adhesive enough to re-bond. Keep the dryer at least 15 cm away.
Safety warnings: never use metal tools, which scratch both the screen and the protector. Stop immediately if you see any crack in the glass. Do not attempt dust removal when particles are near the centre of the screen, as lifting that far risks contaminating the entire adhesive layer. Reusing a protector only works when the adhesive remains clean and undamaged.
How to install a screen protector so it does not lift
Getting installation right is far easier than fixing a lift later. Rushing alignment is the single most common mistake.
- Choose a low-dust room, ideally a bathroom shortly after a hot shower, when airborne particles have settled.
- Clean the screen with the alcohol wipe first, then the microfibre cloth, then a dust sticker across the whole surface.
- Use an alignment tray or installation frame if one is included. These small plastic guides position the protector precisely and reduce one-sided lifting caused by off-centre placement.
- Peel the backing slowly, holding the protector by its edges only.
- Lower it from one end, letting it self-adhere progressively rather than dropping it flat.
- Use a plastic card to push any bubbles from the centre outward to the edges.
- Wait at least 24 hours before fitting a tight case. The adhesive needs time to cure fully, and fitting a case too soon is a common cause of early edge lifting.
Tiny bubbles that appear immediately after installation usually disappear within 24–48 hours as the adhesive settles. Bubbles that grow or multiply over days indicate dust or an oily surface and will not self-resolve.
When to replace rather than repair
Some protectors cannot be rescued, and attempting a repair wastes time while leaving your screen less protected.
- Visible cracks or chips anywhere on the glass.
- Two or more edges lifting simultaneously.
- Persistent bubbles that return after cleaning.
- A milky, grey, or visibly contaminated adhesive layer.
- Reduced touch sensitivity or a gritty feel under the finger.
Micro-cracks are worth a specific mention: they are not always visible at a glance, but they weaken the protector’s ability to absorb impact. If your phone has been dropped and an edge has lifted since, treat the protector as compromised even if it looks intact.
Which protector types resist edge lifting best?
Choosing the right protector for your specific device is the most reliable way to prevent repeat lifting. The trade-offs between tempered glass, hybrid, and film protectors come down to screen shape and how you use your phone.
| Feature | Standard tempered glass | Full-glue curved glass | TPU/film |
|---|---|---|---|
| Adhesion on curves | Poor | Good | Excellent |
| Scratch resistance | Excellent | Good | Moderate |
| Case compatibility | Moderate | Good | Good |
| Feel under finger | Glass-smooth | Glass-smooth | Slightly soft |
- Flat screens: standard tempered glass is the right choice. It adheres evenly, feels premium, and offers strong scratch and impact protection.
- Curved or bevelled screens: full-glue curved tempered glass reduces edge halo substantially. For pronounced curves, a flexible TPU or hybrid film gives the best edge contact.
- Heavy case users: look for “case friendly” protectors that leave a small gap at the edge, preventing the case lip from pressing directly on the adhesive.
Full-glue protectors or flexible films substantially reduce edge halo on curved displays, though they require model-specific fitting and sometimes trade a slightly softer tactile feel for better adhesion. Always buy a protector listed for your exact phone model, not a generic size.
What SmartProtectors sees most often
The vast majority of lifting complaints we encounter trace back to two things: installation done too quickly in a dusty environment, and a case that was fitted within hours of applying the protector. Both are entirely avoidable.
The single most impactful change most people can make is to buy a protector designed specifically for their device’s screen shape. A flat protector on a curved phone will lift. It is not a quality issue with the protector; it is a geometry problem. Choosing a full-glue curved glass option for any device with a curved or bevelled display eliminates the most common source of edge halo from the start.
If you have a curved-screen device and have gone through two or three protectors that all lifted at the edges, the answer is almost certainly the wrong protector type, not bad luck.
The right protector is already at SmartProtectors
If a replacement is the right call, SmartProtectors stocks curved-edge tempered glass protectors and full-coverage options with installation tools included, covering a wide range of smartphones including hard-to-find models. The installation trays bundled with many listings take the guesswork out of alignment, which is the step most people rush. For Samsung Galaxy users, the full-coverage protector with installation tool is a practical starting point. Can’t find your model? Submit a sourcing request and SmartProtectors will add it to the catalogue. Browse the full range at SmartProtectors and check compatibility for your device today.
Sources
When standard fixes have not worked or your device is still under warranty, consult manufacturer guidance before attempting anything more invasive.
If your phone is under warranty, check with the manufacturer before lifting the protector or using any liquid on the screen, as some warranty terms cover screen damage only when no third-party accessories have been applied.